关于Autolayout和Masonry自动布局的几个坑
02 Mar 2016
前言
最近遇到一个复杂视图:根控制器里面有上下两个子控制器,子控制器中各自实现类似PageView的视图,然后PageView的每一页是一个WebView,同时中间有个可拖拽的控件,实现上下两个控制器视图的大小调整。采用子控制器的原因是因为防止所有的逻辑代码都混在根控制器中,所以没有使用nicklockwood的iCarousel或SwipeView,而是采用了之前一直在用的SCPageViewController。
记录下自动布局中遇到的几个坑。
关于translatesAutoresizingMaskIntoConstraints
因为视图太过复杂,所以遇到好几次忘记设置translatesAutoresizingMaskIntoConstraints为NO的情况。translatesAutoresizingMaskIntoConstraints默认为YES,也就是按照默认的autoresizingMask进行计算;设置为NO之后,则可以使用更灵活的Autolayout(或者Masonry)之类的工具进行自动布局。
关于Autolayout的调试
刚开始使用Autolayout遇到下面的警告人容易让人气馁。经常不知所措而放弃了使用Autolayout。
Unable to simultaneously satisfy constraints.
Probably at least one of the constraints in the following list is one you don't want.
Try this:

(1) look at each constraint and try to figure out which you don't expect;
(2) find the code that added the unwanted constraint or constraints and fix it.
(Note: If you're seeing NSAutoresizingMaskLayoutConstraints that you don't understand, refer to the documentation for the UIView property translatesAutoresizingMaskIntoConstraints)

(...........)


Make a symbolic breakpoint at UIViewAlertForUnsatisfiableConstraints to catch this in the debugger.
The methods in the UIConstraintBasedLayoutDebugging category on UIView listed in <UIKit/UIView.h> may also be helpful.
正如输出中所述,Make a symbolic breakpoint at UIViewAlertForUnsatisfiableConstraints to catch this in the debugger,现在介绍下使用UIViewAlertForUnsatisfiableConstraints的调试方法。
在UIViewAlertForUnsatisfiableConstraints添加symbolic breakpoint:
1.打开断点导航(
cmd+7)
2.点击左下角的+按钮
3.选择Add Symbolic Breakpoint
4.在Symbol添加UIViewAlertForUnsatisfiableConstraints
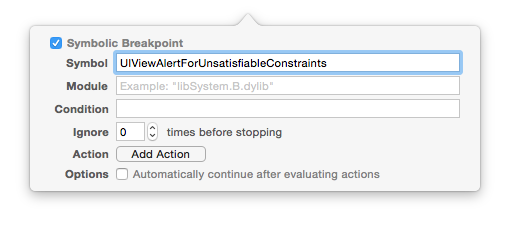
再次调试的时候就可以通过LLDB来调试了,然并卵,如果你不知道LLDB的话。
所以交给你一个小技巧,添加po [[UIWindow keyWindow] _autolayoutTrace](OC项目)或expr -l objc++ -O -- [[UIWindow keyWindow] _autolayoutTrace](Swift项目)。
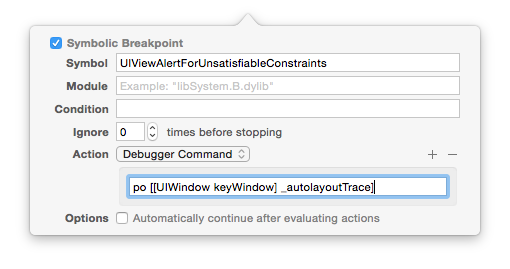
这样就可以直接看到输出:
(lldb) po [[UIWindow keyWindow] _autolayoutTrace]

UIWindow:0x7f9481c93360
|   •UIView:0x7f9481c9d680
|   |   *UIView:0x7f9481c9d990- AMBIGUOUS LAYOUT for UIView:0x7f9481c9d990.minX{id: 13}, UIView:0x7f9481c9d990.minY{id: 16}
|   |   *_UILayoutGuide:0x7f9481c9e160- AMBIGUOUS LAYOUT for _UILayoutGuide:0x7f9481c9e160.minY{id: 17}
|   |   *_UILayoutGuide:0x7f9481c9ebb0- AMBIGUOUS LAYOUT for _UILayoutGuide:0x7f9481c9ebb0.minY{id: 27}
其中AMBIGUOUS相关的视图就是约束有问题的。0x7f9481c9d990就是有问题视图的首地址。
当然进一步的调试需要LLDB的命令。比如
打印视图对象:
(lldb) po 0x7f9481c9d990
<UIView: 0x7f9481c9d990; frame = (0 0; 768 359); autoresize = RM+BM; layer = <CALayer: 0x7fc82d338960>>
改变颜色:
(lldb) expr ((UIView *)0x174197010).backgroundColor = [UIColor redColor]
(UICachedDeviceRGBColor *) $4 = 0x0000000174469cc0
剩下的就是去代码中找到这个视图,然后修改其约束了。
参考:
Debugging iOS AutoLayout Issues
Autolayout Breakpoints
关于Masonry的使用
必须明确AutoLayout关于更新的几个方法的区别
-
setNeedsLayout:告知页面需要更新,但是不会立刻开始更新。执行后会立刻调用layoutSubviews。
-
layoutIfNeeded:告知页面布局立刻更新。所以一般都会和setNeedsLayout一起使用。如果希望立刻生成新的frame需要调用此方法,利用这点一般布局动画可以在更新布局后直接使用这个方法让动画生效。
-
layoutSubviews:系统重写布局
-
setNeedsUpdateConstraints:告知需要更新约束,但是不会立刻开始
-
updateConstraintsIfNeeded:告知立刻更新约束
-
updateConstraints:系统更新约束
基本使用
-
mas_makeConstraints:添加约束
-
mas_updateConstraints:更新约束、亦可添加新约束
-
mas_remakeConstraints:重置之前的约束
注意
-
先添加子视图,才能对子试图添加约束
-
如果想使用动画效果,需要如下代码:
//重写updateViewConstraints方法,进行约束的更新
- (void)updateViewConstraints {
    [self.growingButton mas_updateConstraints:^(MASConstraintMaker *make) {
        make.center.mas_equalTo(self.view);

        // 初始宽、高为100,优先级最低
        make.width.height.mas_equalTo(100 * self.scacle).priorityLow();
        // 最大放大到整个view
        make.width.height.lessThanOrEqualTo(self.view);
    }];
    [super updateViewConstraints];
}


// 通知需要更新约束,但是不立即执行
[self setNeedsUpdateConstraints];
// 立即更新约束,以执行动态变换
// update constraints now so we can animate the change
[self updateConstraintsIfNeeded];
// 执行动画效果, 设置动画时间
[UIView animateWithDuration:0.2 animations:^{
   [self layoutIfNeeded];
}];
- 经过测试,又找到一个方法,remake约束之后直接使用动画
layoutIfNeeded即可。
self.button = ({
   UIButton *button = [[UIButton alloc] init];
   button.backgroundColor = [UIColor orangeColor];
   [self.view addSubview:button];
   [button mas_makeConstraints:^(MASConstraintMaker *make) {
       make.centerX.equalTo(self.view);
       make.width.height.equalTo(@100);
       make.top.equalTo(self.blueView.mas_bottom).with.offset(20);
   }];
   @weakify(self);
   [[button rac_signalForControlEvents:UIControlEventTouchUpInside] subscribeNext:^(id x) {

       @strongify(self);
       [self.blueView mas_remakeConstraints:^(MASConstraintMaker *make) {
        //这里进行大小状态的判断
           if (!self.isBigger) {
               make.top.bottom.left.right.equalTo(self.view).with.insets(UIEdgeInsetsMake(50, 50, 200, 50));
           } else {
               make.center.equalTo(self.view);
               make.width.height.equalTo(@200);
           }
       }];
       [UIView animateWithDuration:0.25f animations:^{
           [self.view layoutIfNeeded];
       }];

       self.isBigger = !self.isBigger;
   }];
   button;
});
关于UIScrollView的自动布局
上面提到的页面遇到了多重的UIScrollView,使用自动布局的时候也是够蛋疼的。具体使用技巧参考Masonry自动布局详解九:复杂ScrollView布局、在UIScrollView中使用Autolayout布局以及iOS_autoLayout_Masonry。主要注意点为:
- UIScrollView自身的约束按照正常的视图添加。
- 内部子控件的约束不能按照UIScrollView来设置,同时必须完整,否则撑不起contentSize。
- 考虑到以上两点,跟计算出来没什么两样了。
可以使用辅助的contentView来设置,思路大概如下
//首先设置scrollview的约束
[_scrollView mas_makeConstraints:^(MASConstraintMaker *make) {
		make.edges.equalTo(self.view); // self.view一样大小
}];
//然后设置contentView的约束
_contentView.backgroundColor = [UIColor greenColor];
   [_contentView mas_makeConstraints:^(MASConstraintMaker *make) {
		make.edges.equalTo(_scrollView); // 大小   = _scrollView
       make.width.equalTo(_scrollView); // width  = _scrollView
}];

UIView *lastView;
CGFloat height = 25;

//添加子视图,并且设置子试图的约束,注意top的约束由上一个子视图决定
for (int i = 0; i < 10; i++) {
	UIView *view = [[UIView alloc]init];
	view.backgroundColor = [self randomColor];
	[_contentView addSubview:view];

   [view mas_makeConstraints:^(MASConstraintMaker *make) {
		make.top.equalTo(lastView ? lastView.mas_bottom : @0); // 第一个View top = 0;
		make.left.equalTo(@0); // left 0
		make.width.equalTo(_contentView); // width = _contentView;
		make.height.equalTo(@(height)); // height = height
   }];

   height += 25;
   lastView = view;
}

[_contentView mas_makeConstraints:^(MASConstraintMaker *make) {
	make.bottom.equalTo(lastView); // bottom =  lastView
}];
不过对于我的项目来讲计算的太蛋疼了,于是偷了个懒,因为从pageview往里的每个view都是撑满父视图的,所以也就可以使用默认的autoresizingMask进行自适应布局啦。
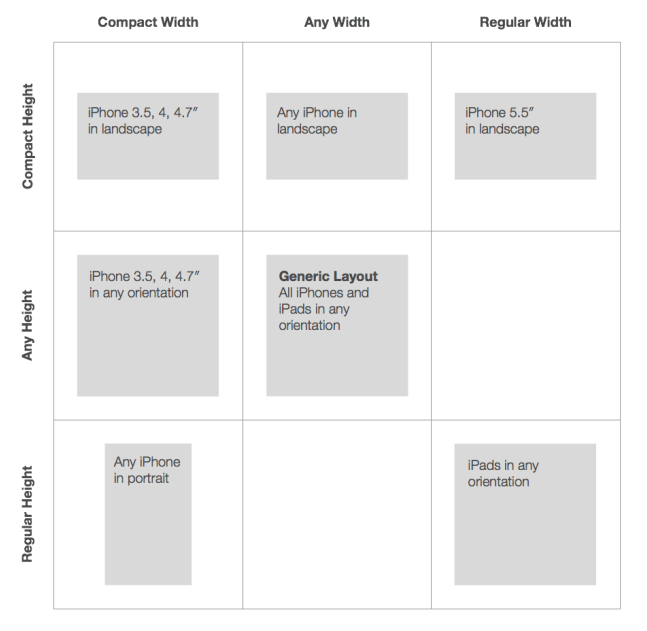
SizeClass示意图
一般如果涉及到iPad的布局,最好还是用SizeClass比较方便。
约束添加注解:
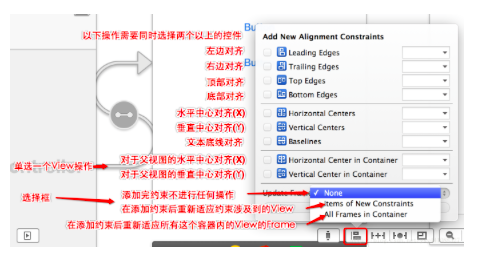
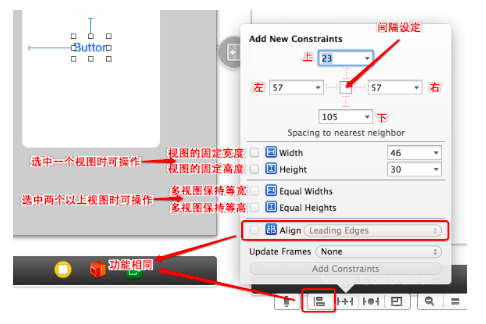
SizeClass注解:
